Choosing the Right Paper for T-Shirt Printing (Made Simple)

If you’ve ever printed a design and thought, “Why doesn’t this look right?” — there’s a good chance the issue wasn’t your printer… it was your paper.

Choosing the right transfer paper might seem like a small detail, but it actually makes a huge difference in how your final product looks and feels.

Better paper = better prints = happier customers

Whether you’re just starting out or already running a t-shirt business, this guide will help you pick the right paper without the confusion.

Why the Right Paper Matters So Much

A lot of people focus on machines: printers, heat presses, inks, but overlook paper.

Here’s what good transfer paper actually does:

  • Helps your design come out sharp and vibrant

  • Makes sure the ink transfers properly

  • Improves how long the print lasts

  • Reduces common issues like peeling or fading

Think of it like this:
Even a great printer can’t fix poor-quality paper.

The Main Types of Transfer Paper (Explained Simply)

Let’s break this down in a way that’s easy to understand.

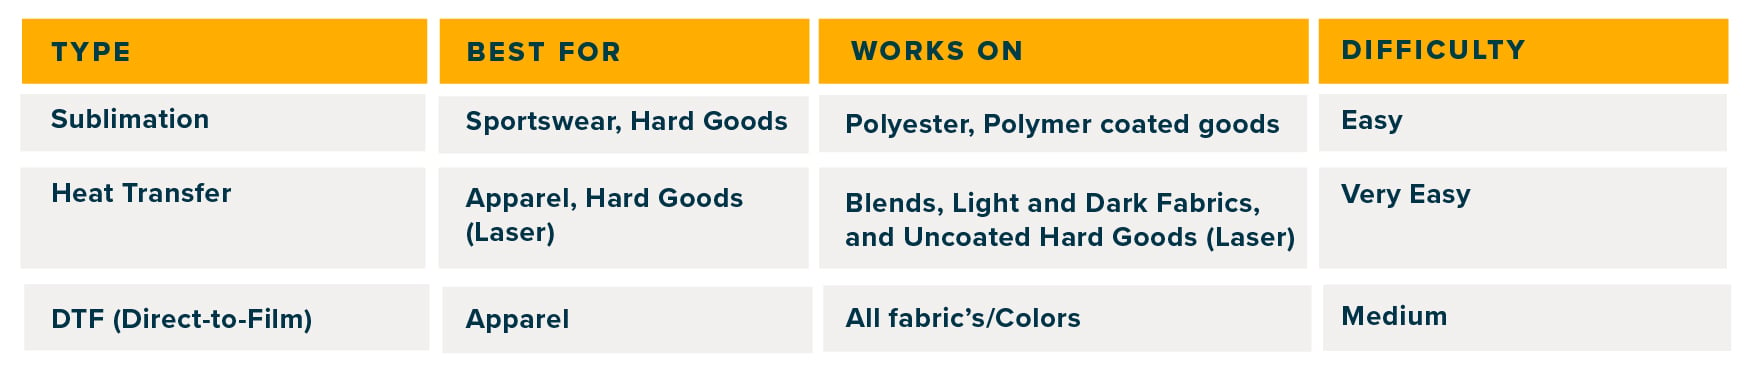
1. Sublimation Paper

Best for: Polyester fabrics and light-colored items

This is what you’ll use if you’re doing sublimation printing.

What makes it different is that the ink doesn’t sit on top, it actually becomes part of the fabric.

Why people love it:

  • Prints don’t crack or peel

  • Colors look bright and clean

  • Feels like there’s nothing on the shirt

Perfect for:

  • Sports jerseys

  • Performance wear

  • Mugs and custom gifts

Sublimation Sheet Options

What Sublimation Paper Should I Use for Epson F170/F570 & Sawgrass Printers?

If you’re getting into sublimation or trying to improve your print quality, you’ve probably asked:

“What sublimation paper should I actually use?”

It’s a common question—and honestly, it can feel a little confusing at first. The good news is, once you understand the basics, it’s pretty simple. The right paper will help you get brighter colors, cleaner transfers, and more consistent results without a lot of trial and error.

Let’s break it down in a way that actually makes sense.

Epson F170/F570 users – keep it simple

If you’re using an Epson F170/F570, you’ll want a paper that keeps ink on the surface and releases it easily when you press it. That’s what gives you those sharp, vibrant results.

How it works:

These papers are designed so the ink doesn’t soak in too much. Instead, it stays closer to the surface, which helps it transfer better onto your product.

Some solid, go-to options:

  • ImageRight Sublimation Paper
  • TexPrint DTR Heavy Sublimation Paper
  • Epson DS Transfer Sublimation Paper sheets

These are great for everyday use—things like mugs, shirts, and hard goods. They’re reliable, easy to work with, and don’t require a lot of testing to get good results.

Important tip:

Most people stick with 105–120 GSM paper for general use. It’s a good balance between ink handling and transfer quality.

What to expect:

  • Clean, sharp transfers
  • Bright, consistent color
  • Smooth, repeatable results
Sawgrass SG500 / SG1000 users – go with proven options

If you’re running a Sawgrass printer, it’s usually best to stick with papers that are known to work well with their ink system.

How it works:

These papers are designed to control how ink sits and releases, which helps keep your colors accurate and consistent.

Some reliable options:

  • ImageRight
  • TexPrint DTR Heavy
  • VersiFlex

Important tip:

Once you find a paper that works, stick with it. Consistency is key with Sawgrass setups.

What to expect:

  • Even color output
  • Smooth, clean transfers
  • Reliable performance from job to job
Want one paper for both printers?

If you’re using both Epson and Sawgrass—or just want to keep things simple—you don’t need to overthink it.

Good all-around option:

ImageRight Sublimation Paper

This paper gives you solid, dependable results without complicating your workflow.

A quick note on specialty papers

You might run into specialty papers like:

  • Tacky sublimation paper to help hold fabric in place during pressing
  • VersiFlex for Sawgrass system, for cotton and light colored fabrics

These can be helpful, but only if your specific application calls for them.

Epson vs. Sawgrass – what’s the difference?

Feature Epson F170/F570 Sawgrass SG500/SG1000
Paper type High-release, quick-dry Color-controlled
Popular options ImageRight, Epson DS ImageRight, TexPrint series
Best use General sublimation Consistent color output

Quick recommendations

  • Using an Epson F170/F570? Go with ImageRight or Epson DS.
  • Using a Sawgrass SG500/SG1000? Go with ImageRight or TexPrint DTR.
  • Want one paper for both? Use ImageRight or TexPrint.

Final thoughts

Sublimation paper doesn’t need to be complicated. If you match the paper to your printer and stick with something reliable, you’ll get better results with a lot less frustration.

Once you find a setup that works, consistency is what really helps you improve your print quality over time.

If your colors look good, your transfers come out clean, and your results are repeatable—you’re using the right paper.

Sublimation Roll Options

What Sublimation Paper Rolls Should I Use for Wide Format Printers?

If you’re running a wide format sublimation printer—or trying to dial in better results—you’ve probably asked:

“What sublimation paper rolls should I actually be using?”

It’s a common question, especially once you move into larger production. The good news is, once you understand the basics, it’s pretty straightforward. The right paper will help you get better color, cleaner transfers, and more consistent results without slowing down your workflow.

Let’s break it down in a way that actually makes sense.

Epson F6470/F9570 users – keep it fast & consistent

If you’re using an Epson F6470/F9570, your setup is built for production. You need a paper that can keep up with speed while still delivering solid results.

How it works:

These papers are designed to dry quickly and keep ink on the surface, so it transfers efficiently onto fabric or hard goods.

Some solid, go-to options:

  • ColorBlast TruHue or TruTac
  • Jetcol HTR3500 or TA
  • Epson DS Production Sublimation Rolls

These are great for everyday production—especially for apparel, banners, and soft signage. They’re reliable and easy to run without constant adjustments.

Important tip:

Most shops stick with 90–105 GSM for daily production. It’s a good balance between speed, ink handling, and color output.

What to expect:

  • Fast drying during printing
  • Clean, consistent transfers
  • Strong, repeatable color
Mimaki users – go with versatile, reliable paper

Mimaki printers are often used across a mix of applications, so flexibility matters.

How it works:

You want paper that handles different ink loads and materials without needing constant changes to your settings.

Some reliable options:

  • ColorBlast TruHue non-tacky or TruTac
  • Jetcol High Speed or TA tacky papers
  • TexPrint sublimation rolls

Important tip:

Once you find a paper that runs well on your setup, stick with it. Consistency will save you time and reduce waste.

What to expect:

  • Stable performance across jobs
  • Even color output
  • Fewer adjustments between runs
Mutoh users – keep it balanced & predictable

If you’re running a Mutoh printer, the goal is to keep things steady and predictable.

How it works:

You want paper that manages ink well without overcomplicating your workflow.

Some dependable options:

  • Jetcol TA tacky or High Speed papers
  • ColorBlast TruHue or TruTac tacky
  • TexPrint sublimation rolls

Important tip:

Avoid constantly switching papers—consistency is key for maintaining quality.

What to expect:

  • Balanced ink absorption and release
  • Smooth, consistent transfers
  • Reliable day-to-day performance
Printing on fabric? Use tacky paper

If you’re printing on fabric or apparel, this part is important.

How it works:

Tacky sublimation paper has a light adhesive coating that helps hold fabric in place during pressing. This reduces shifting and helps prevent ghosting.

Good options:

  • ColorBlast TruTac, 85–100 GSM
  • Jetcol TA
  • SubliColor SuperSport tacky rolls

Best for:

  • Jerseys
  • Sportswear
  • Stretch fabrics
Want to keep it simple? Use one paper for everything

If you don’t want to switch papers depending on the job, you can use a general-purpose sublimation roll.

Good all-around options:

  • ColorBlast TruHue non-tacky, high release
  • Jetcol HTR3500
  • TexPrint sublimation rolls

These give you consistent results without overcomplicating your workflow.

Epson vs. Mimaki vs. Mutoh – what’s the difference?

Feature Epson F6470/F9570 Mimaki Mutoh
Paper focus Fast-dry, high-release Versatile performance Balanced reliability
Popular options ColorBlast TruHue, Epson DS ColorBlast TruHue, Jetcol 3500 TexPrint, Jetcol
Best use High-volume production Mixed applications Consistent production
Flexibility High High High

Quick recommendations

  • Using an Epson F6470/F9570? Go with ColorBlast TruHue or Jetcol HTR3500.
  • Using a Mimaki? Go with ColorBlast TruHue or Jetcol HTR3500.
  • Using a Mutoh? Go with TexPrint or Jetcol HTR3500.
  • Printing on fabric? Use tacky paper like ColorBlast TruTac.
  • Want a safe all-around option? Use 90–105 GSM non-tacky paper like ColorBlast TruHue or Jetcol HTR3500.

Final thoughts

Wide format sublimation doesn’t have to be complicated. If you match the paper to your printer and stick with something reliable, you’ll get better results with less frustration.

Once you find a setup that works, consistency is what really helps you improve your production quality over time.

If your colors look strong, your transfers are clean, and your results are repeatable, you’re using the right paper.

2. Heat Transfer Paper (Inkjet or Laser)

Best for: Beginners or small-scale printing

This is usually where most people start.

You print your design, press it onto the shirt, and you’re good to go.

What to know:

  • Easy to use

  • Works with inkjet pigment based printers, or laser systems (like the Crio Powderless DTF+)

  • Good for testing ideas

Just make sure you choose the right type:

  • Light paper → for white shirts

  • Dark paper → for black or dark shirts

Simple, affordable, and beginner-friendly for inkjet printers.


Inkjet Heat Transfer Paper Options

Inkjet Transfer Paper Guide: Light vs Dark Fabrics Explained

If you’re making custom t-shirts with an inkjet printer, you’ve probably asked:

“Do I need transfer paper for light shirts or dark fabrics?”

It’s a very common question, and it’s also where a lot of people run into problems.

Using the right transfer paper makes a big difference. It’s what helps your design come out bright, clean, and long-lasting, instead of faded or hard to see.

Let’s keep it simple.

Transfer paper for light fabrics – best for white & light shirts

If you’re printing on white or light-colored shirts, you’ll want transfer paper made for light fabrics.

How it works:

Light transfer paper is transparent, so the color of the shirt shows through your design.

Some solid, easy-to-use options:

  • JET-PRO Soft Stretch
  • VersiFlex Light Media available in sizes like 8.5" × 11", 11" × 17", and 13" × 19"

Best for:

  • White t-shirts
  • Light gray or pastel fabrics
  • Designs with darker colors

Important tip:

You’ll need to mirror your design before printing, since it presses face-down.

What it feels like:

  • Softer, more natural finish
  • Design blends into the fabric rather than sitting on top
Transfer paper for dark fabrics – best for black & colored shirts

If you’re printing on black or dark-colored shirts, you’ll need transfer paper made for dark fabrics.

How it works:

This type of paper has a white base layer, so your design sits on top of the fabric and stays visible.

Some reliable options:

  • 3G Jet Opaque Heat Transfer Paper
  • EasyJet for Darks

Best for:

  • Black shirts
  • Dark colors like navy, red, or green
  • Bright, colorful designs

Important tip:

Do not mirror your design—print it as-is and apply it face-up.

What it feels like:

  • Slightly thicker than light paper
  • Colors appear bold and vibrant

Light vs Dark – what’s the difference?

Feature Light Paper Dark Paper
Shirt color White / light Dark / black
Paper type Transparent/White backing White backing
Design look Blends into fabric Sits on top
Mirroring Yes No
Feel Softer Slightly thicker

Can you use one paper for both?

Short answer: No.

  • Light paper on a dark shirt → design won’t show clearly
  • Dark paper on a light shirt → visible white background

Always match the paper to the shirt color for the best results.

Quick recommendations

  • Printing on white or light shirts? Use VersiFlex Light Media (Sawgrass Printers) or JET-PRO Soft Stretch (Inkjet pigment based printers).
  • Printing on black or dark shirts? Use 3G Jet Opaque or EasyJet for Darks.

Final thoughts

Inkjet transfer paper doesn’t have to be complicated.

Just remember:

  • Light shirts = light transfer paper
  • Dark shirts = dark transfer paper

Once you’re using the right type, everything gets easier, and your prints will look better and last longer.

Laser Heat Transfer Paper Options

Laser Transfer Paper Guide: Light vs Dark/No-Cut Explained

If you’re using a laser printer for custom t-shirts or apparel, you’ve probably asked yourself:

“Which laser transfer paper should I actually use, light, dark/no-cut?”

It’s one of the most common questions, and it can feel confusing at first. The good news is, once you understand the basics, it’s pretty straightforward. The right paper will help you get better color, cleaner transfers, and a more professional-looking result without wasting time or materials.

Let’s break it down in a simple, practical way.

Light fabric users – keep it simple

If you’re printing on white or light-colored shirts, light transfer paper is usually the easiest option.

How it works:

Light transfer paper is transparent or white coated transfer sheet, so the shirt color shows through your design if a darker color.

Some reliable options:

  • Magic Touch T.ONE
  • FOREVER Laser Light
  • TechniPrint EZP
  • Magic Touch TTC 3.1

These are great for everyday use, especially for basic logos and simple designs. They’re easy to work with and give you a softer feel on the shirt.

Important tip:

You’ll need to mirror your design before printing, since it presses face-down.

What it feels like:

  • Soft and lightweight
  • Design blends into the fabric

Dark/ No-cut fabric users – go bold and visible

If you’re printing on black or dark-colored garments, you’ll need transfer paper made specifically for dark fabrics.

How it works:

  1. Print your design on an A sheet
  2. Press it together with a B sheet adhesive layer
  3. Then apply it to your garment

Some dependable options:

  • FOREVER Laser Dark A&B Sheet Sets
  • Magic Touch WOW 7.8
  • Forever Flex Soft

These are designed to give you bright, vibrant results, even on darker materials.

What it feels like:

  • Slightly thicker than light paper
  • Colors appear more bold and solid

Light vs Dark/ No-Cut – what’s the difference?

Feature Light Paper Dark/No-Cut Paper
Shirt color Light only Both
Mirroring Yes No
Finish Soft, blended Clean, professional
Cutting needed No No
Best for Simple designs Detailed prints

Want one option for everything?

If you’re trying to simplify your workflow, no-cut transfer paper is the closest thing to an all-in-one option.

It works on both light and dark fabrics and gives a cleaner finish, but it does require an extra step compared to standard papers.

A quick note on specialty papers

You may also see specialty options like:

  • FOREVER Multi-Trans Pro for hard surfaces
  • Magic Touch CPM for hard surfaces
  • FOREVER Tattoo Paper

These are useful for specific applications, but not necessary for standard apparel printing.

Quick recommendations

  • Printing on white or light shirts? Use Magic Touch T.ONE or FOREVER Laser Light with Crio/ White Toner Systems.
  • Printing on black or dark shirts? Use FOREVER Laser Dark A&B sheets with Crio / White Toner Systems.
  • Looking to print onto light and dark and specialty materials? Forever Laser Dark for Crio / White Toner Systems

Final thoughts

Laser transfer paper doesn’t have to be complicated.

Match the paper to your fabric and application, and you’ll get better results with less frustration. Once you find what works for your setup, staying consistent will make a big difference in your overall print quality.

If your prints look sharp, feel good on the garment, and hold up over time, you’re using the right setup.

3. DTF Film (Direct-to-Film)

Best for: Growing or serious t-shirt businesses

This is a more advanced option, but also one of the most flexible.

You print on film, apply powder, cure the powder/film and then press it onto the fabric, or you can use a sheeted adhesive sheet (like with the Crio Powderless DTF+ system)

Why it’s popular:

  • Works on almost any fabric (cotton, polyester, blends)

  • Great for detailed designs

  • Very durable

If you're planning to scale your business, this is a strong option.


DTF Options

Which DTF Film Should I Use for My Printer? Rolls vs Sheets Guide

If you’re getting into DTF printing—or just trying to dial in better results—you’ve probably asked yourself:

Should I be using DTF film sheets or rolls?

It’s a fair question.

The film you choose has a big impact on how your prints come out. The right one will give you better adhesion, cleaner transfers, and more consistent results—without wasting time or materials.

Let’s keep it simple and break it down.

DTF film sheets – easy to use & great for smaller jobs

If you’re running a desktop DTF printer or doing smaller, custom orders, sheets are usually the way to go.

Some solid options:

  • 13" × 19" or 16" × 20" ColorBlast Double Sided DTF Film Sheets
  • ColorBlast Double Sided DTF Film Rolls

Sheets are straightforward—just load them like regular paper and hit print.

Why people like sheets:

  • Super easy to use no setup headaches
  • Great for short runs or one-off designs
  • Perfect if you’re just getting started

DTF film rolls – built for speed & production

If you’re printing more volume or want to speed things up, rolls are the better choice.

Some reliable options:

  • 11.8" × 328' ColorBlast Double Sided DTF Film Roll
  • 11.8" × 110' ColorBlast Sample Roll
  • 24" × 328' ColorBlast Double Sided DTF Film 2 Rolls
  • 32" × 328' ColorBlast Double Sided DTF Film

With rolls, you can keep printing without constantly stopping to reload.

Why shops switch to rolls:

  • Faster workflow huge time saver
  • Better for gang sheets and bulk jobs
  • Less waste on larger runs

Rolls vs Sheets – what’s the real difference?

Feature Sheets Rolls
Setup Very easy Takes a little setup
Speed Slower Faster continuous printing
Best for Small jobs High-volume production
Workflow Simple More efficient long-term

Hot peel vs cold peel – quick tip

You’ll also see hot peel and cold peel films.

  • Hot peel → Peel it right away faster and more efficient
  • Cold peel → Let it cool first slightly softer feel

Most shops stick with hot peel because it keeps production moving.

Will this work with my printer?

Most DTF films today are made to work with common setups like:

  • Desktop DTF printers
  • XP600, i1600, i3200 printheads

As long as you’re using DTF ink, powder, and a heat press, you’re good to go.

Quick recommendations

  • Running a small or desktop setup? Go with DTF film sheets 13" × 19" or 16" × 20".
  • Running a print shop or higher volume? Use DTF film rolls 11.8", 24", or 32".
  • Want faster production? Choose hot peel film.
  • Just testing things out? Start with a sample roll.

Final thoughts

DTF film doesn’t need to be complicated.

Start simple. If you’re doing smaller jobs, sheets will get the job done without any hassle. As you grow, switching to rolls will save you time and money.

Once you find a film that works well with your setup, stick with it. Consistency is what really helps you get clean, professional results every time.

If your prints look sharp, peel clean, and hold up well—you’re using the right film

How to Choose the Right Paper (Without Overthinking It)

If you’re feeling overwhelmed, just follow this simple logic:

Step 1: What fabric are you using?

  • Polyester → Go with sublimation paper if you have a Sublimation printer. ImageRight is a great paper solution. 

  • Cotton or blends → Use DTF film or heat transfer paper. ColorBlast film for DTF, or Forever Laser Dark/MagicTouch T.One (lights) for Powederless DTF+ systems is the best way to go. 

Step 2: What color is the fabric?

  • Light-colored → Most options work depending on the system you are using

  • Dark-colored → Use DTF or dark transfer paper. ColorBlast film for DTF, or Forever Laser Dark for Powderless DTF+ is a great option

Step 3: Where are you in your journey?

  • Just starting → Sublimation or Inkjet Heat transfer paper

  • Getting consistent orders → Sublimation or Powderless DTF+

  • Scaling your business → DTF or Wide Format Sublimation

That’s really all you need to decide.

Quick Comparison (Easy to Remember)


Common Mistakes (Avoid These)

These are mistakes almost everyone makes at the beginning:

  • Using sublimation paper on cotton ❌

  • Using light transfer paper on dark shirts ❌

  • Buying cheap paper to save money ❌

  • Not matching paper with printer type ❌

Quick tip: Always match your paper + fabric + printer.

Real-Life Example

Let’s say you want to start a t-shirt business:

  • Printing on cotton shirts? → Go with DTF, Inkjet or Powderless DTF+ systems like the Crio 8432 

  • Making gym wear or jerseys? → Use sublimation

  • Testing designs at home? → Start with heat transfer paper for inkjet printers, or small format Sublimation

Should You Stock Up on Paper?

If you’re printing regularly, buying paper in bulk can actually save you time and money.

Why it helps:

  • Lower cost per print

  • Consistent results

  • You’re always ready for orders

This is especially useful if you’re growing your business.

Quick Recap (Keep This in Mind)

  • There’s no “one best paper”—it depends on what you’re printing and the system you are printing from

  • Sublimation = best for polyester and beginners

  • DTF = best for flexibility and growth

  • Laser Heat transfer (Crio Powderless DTF+) = best for a versatile shop getting started or intermediate level

  • Inkjet Heat transfer = best for beginners

The right paper doesn’t just improve prints—it improves your business results.

FAQs (Straightforward Answers)

1. What is the best transfer paper for t-shirts?

It depends on your fabric and printer. DTF and inkjet/laser heat transfer works on all fabrics, while sublimation is best for polyester.

2. Can I use sublimation paper on cotton?

No, it won’t work properly unless the fabric is specially coated, or working with additional system/media such a Sawgrass VersiFlex. 

3. What should beginners start with?

Heat transfer paper is the easiest and most affordable option to start.

4. Is DTF better than heat transfer paper?

Depnds on your volume, it’s durable and works on many materials like heat transfer—but it costs more to start.

5. How do I know which paper to use?

Start with your printer type, then match it with the fabric you are working with.

Final Thoughts

At the end of the day, choosing the right paper isn’t about being perfect, it’s about making the right choice for your setup.

If you’re just starting:
Keep it simple

If you’re growing:
Start upgrading your materials

Because once your prints look better…
everything else gets easier, sales, branding, and customer trust.